Getting Started on ePlatform
Welcome to ePlatform. Your digital library is ready, and this guide outlines the key administrative tasks to review before introducing ePlatform to students and staff.
You will learn where to find the main Admin tools, how to add patrons, how to review content restrictions, how to connect your Library Management System, and how to test the student experience.
This article is intended for librarians, teachers, and staff with access to the ePlatform Admin area.
About the navigation in this guide: Paths such as Admin area → Patrons → Import / Update Patrons show where to find a feature after signing in to your library's ePlatform portal.
On this page
- Video tutorial
- Before you begin
- 1. Familiarise yourself with the Admin area
- 2. Add students and staff and review login options
- 3. Share access details with readers
- 4. Review Patron Management Settings
- 5. Review age and year-level restrictions
- 6. Connect your Library Management System
- 7. Customise your library
- 8. Test the student experience
- 9. Launch and monitor your library
- Getting help
- Frequently asked questions
Video tutorial
Watch this staff setup guide for an overview of getting started with ePlatform.
Before you begin
Confirm that you have:
- Administrator access to your library's ePlatform portal;
- The contact details of the staff member responsible for your library;
- An IT contact if your school uses SSO, LDAP, SIP2, or another technical connection;
- Student or staff data if you plan to add patrons using a spreadsheet; and
- Two or three accounts that can be used to test logging in and borrowing.
1. Familiarise yourself with the Admin area
After signing in as an administrator, review the Admin sidebar and the Quick Guides & Links panel.
The Admin area provides access to your library settings, patrons, classes, content restrictions, catalogue, Shop, analytics, plans, billing information, and support resources.
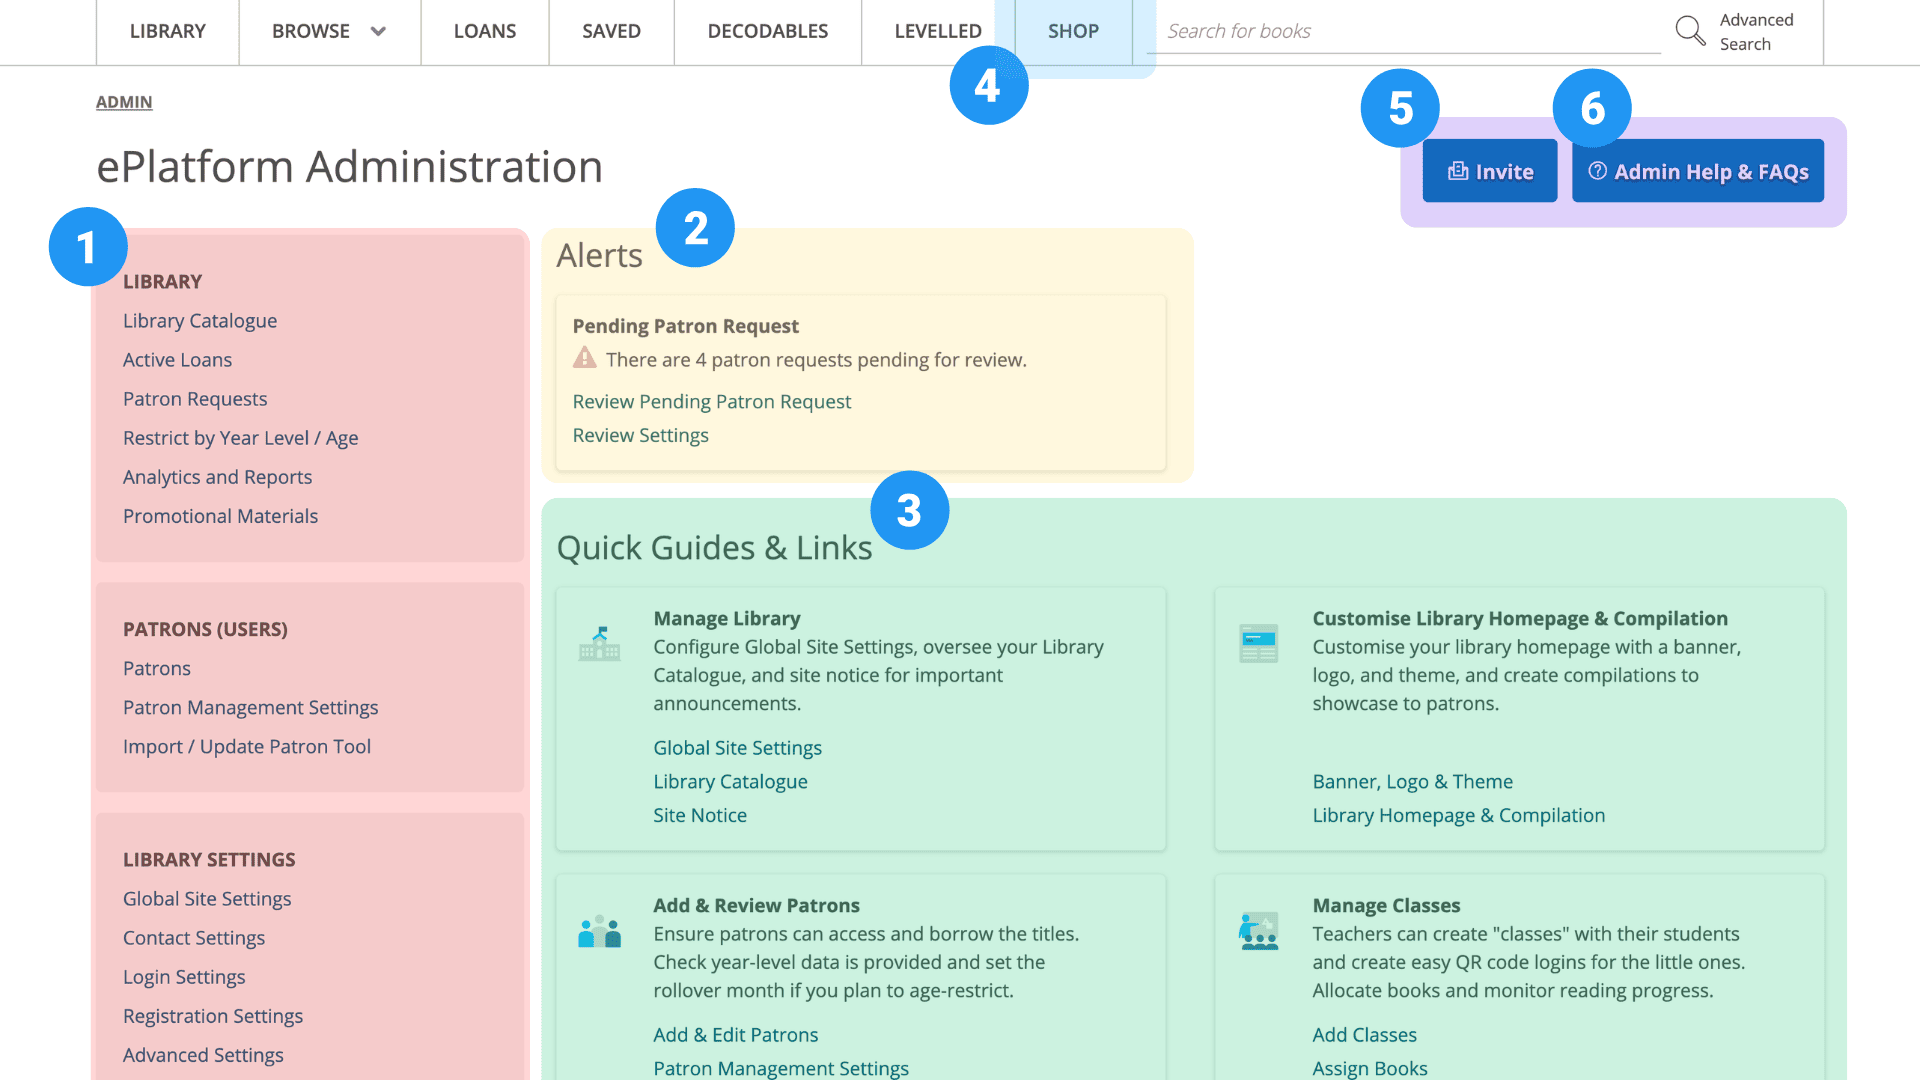
| Admin feature | What it provides |
|---|---|
| Admin sidebar | The main navigation menu for your ePlatform administration tools. |
| Alerts | Notifications about items that may require your attention. |
| Quick Guides & Links | Shortcuts to commonly used library, patron, class, restriction, analytics, and billing tools. |
| Shop | Purchase private titles and class sets for your library. |
| Invite | Access tools for inviting students or staff to your ePlatform library. |
| Admin Help & FAQs | Search administrator documentation or access technical support. |
2. Add students and staff and review login options
Students and staff are referred to as patrons in the ePlatform Admin area. Patrons need a way to log in before they can borrow eBooks, Audiobooks, or Decodable Readers.
Go to Admin area → Patrons to review the patrons currently recorded in your library.
Add a patron individually
Use this option when you need to add one student or staff member.
- Go to Admin area → Patrons.
- Select Add Patron.
- Enter the patron information requested on the page.
- Save the patron.
Import or update multiple patrons
Use the Import / Update Patrons tool when you need to add or update multiple patron records using a spreadsheet.
- Go to Admin area → Patrons → Import / Update Patrons.
- Download the sample template available from the import page.
- Add or update the patron information in the spreadsheet.
- Upload the completed file through the Import / Update Patrons page.
The barcode or username is used to identify the patron. Other information, such as name, role, year level, and date of birth, may also be included depending on your library's setup.
Use an existing authentication system
Instead of creating separate ePlatform login details, your organisation may connect ePlatform to an existing authentication system.
Authentication options documented for ePlatform include:
- Single Sign-On (SSO): patrons use their existing school or organisation account;
- LDAP: patrons use their existing network credentials; and
- SIP2: library patrons use credentials from a compatible Library Management System.
These connections require technical configuration. Work with your IT team and ePlatform Support when setting up or changing an authentication connection.
For more information, see:
3. Share access details with readers
Select Invite in the Admin area to access the options available for sharing your ePlatform library with students and staff.
Make sure readers receive the correct library link or app setup details and the sign-in method used by your school. If readers use SSO, direct them to the SSO option shown on your library login page. If they use ePlatform usernames and passwords, provide those details through your school’s approved process.
Before sharing access widely, test the instructions with a reader account. See How to Sign In for the reader-facing steps.
4. Review Patron Management Settings
Go to Admin area → Patron Management Settings to review the settings used to manage patron records over time.
Depending on your library's configuration, this area may include settings for:
- year-level rollover;
- disabling inactive patrons;
- permanently deleting disabled patrons; and
- reviewing disabled or deleted patron logs.
Before saving a change, review the number of affected patrons displayed on the page. Confirm that the settings are appropriate for your organisation and will not disable or delete active students or staff.
Patron data supplied through SSO
When patrons log in through SSO, their ePlatform accounts can be created or updated using data sent by the identity provider.
If your SSO connection sends a form class or year-level attribute, ePlatform can assign that information when the patron signs in. If the required attribute is not supplied, the patron account may be created without a year level.
For more information, see Syncing Form, Class and Year-Level Information with SSO.
4. Review age and year-level restrictions
ePlatform can restrict titles using patron age or year-level information.
- Restrict by year level: Admin area → Restrict Titles by Age or Year Level → Restrict by Year Level.
- Restrict by age: Admin area → Restrict Titles by Age or Year Level → Restrict by Age.
Age restrictions require date-of-birth information to be supplied through your patron data or authentication method.
Year-level restrictions require year-level information to be supplied through your patron data or authentication method.
Before applying restrictions to multiple titles, confirm that the relevant patron information is available and accurate.
For detailed information, see Restricting Titles by Age or Year Level.
5. Connect your Library Management System
If your school uses a Library Management System, you can make ePlatform eBooks and Audiobooks discoverable through its existing library catalogue.
The repository documentation describes two approaches:
- Live catalogue integration: a supported API keeps catalogue information updated automatically.
- MARC records: export title records from ePlatform and import them into your Library Management System.
Manual MARC records do not update automatically. If titles are added, removed, or expire, the corresponding records in your Library Management System may also need to be updated.
For more information, see:
6. Customise your library
Use the following Admin tools to update how your library appears to students and staff:
- Banner, logo, and theme: Admin area → Customise Library Homepage & Compilation → Banner, Logo & Theme.
- Homepage compilations: Admin area → Customise Library Homepage & Compilation → Library Homepage & Compilation.
- Site notice: Admin area → Manage Library → Creating and Updating a Site Notice.
- Library contact details: Admin area → Manage Library → Global Site Settings → Contact Settings.
For detailed instructions, see:
- Customising Your Library Banner Image, Logo and Theme
- Creating & Managing Homepage Book Compilations
- Customising Customising Homepage Collection Tiles
- Creating and Updating a Creating and Updating a Site Notice
7. Test the student experience
Before sharing ePlatform with students and staff, use a test account to check the complete borrowing process.
- Sign out of the Admin area.
- Open your library's ePlatform website or add the library in the ePlatform app.
- Log in using a test patron account.
- Confirm that the correct library and expected titles are displayed.
- Search for an available eBook.
- Borrow the eBook and confirm that it opens in the reader.
- Search for an available Audiobook.
- Borrow the Audiobook and confirm that playback begins.
- Open Loans and confirm that the borrowed titles are displayed.
- If your library uses age or year-level restrictions, repeat the test using accounts with different patron information.
- If your library uses an external catalogue, open an ePlatform title from that catalogue and confirm that its link works.
If any part of the test fails, record the affected account, device or browser, navigation path, and exact error message before contacting support. Do not record or send the patron's password.
8. Launch and monitor your library
After testing the student experience:
- share your library's ePlatform web address with students and staff;
- provide the setup code or QR code used to add the library in the mobile app;
- explain how students should log in;
- tell students and staff who to contact at school if they need account help; and
- use the available promotional materials to introduce the collection.
Promotional resources are available from Admin area → Library → Promotional Materials.
For launch ideas, see Promotion Strategies.
Monitor library usage
Go to Admin area → View Analytics & Reports → Analytics Overview to review library activity.
The Analytics Overview includes information about loans, reserves, active patrons, active titles, and how patrons are accessing ePlatform.
For more information, see Viewing Usage Analytics.
Frequently asked questions
What should I do if I am replacing the previous ePlatform librarian?
Start with Taking Over an Existing ePlatform Library. It explains how to review administrator access, contacts, patron management, library settings, integrations, billing, and the current reader experience before making changes.
Where can I find ePlatform blog posts and collection announcements?
Visit the ePlatform blog. When new eBooks or Audiobooks are added to a Shared Collection, ePlatform may publish a regional announcement describing the additions.
How long does it take to set up ePlatform?
The time required depends on how your school manages patron accounts, authentication, library-system integration, and content settings. Manual patron imports can be completed in the Admin area. SSO, LDAP, SIP2, API, or Library Management System connections may require coordination with your IT team and ePlatform Support.
Is training or setup support available?
Yes. Review ePlatform Video Tutorials or contact support@eplatform.co for help with setup, training, or technical configuration.
Getting help
Open Admin Help & FAQs from the Admin area to search the ePlatform knowledge base or access technical support.
You can also email support@eplatform.co.
When requesting support, include:
- your school or library name;
- your ePlatform portal address;
- the affected feature;
- the navigation path you followed;
- the device or browser used; and
- the exact error message displayed.